|
Model Trains For Beginners:
How I Constructed the Model Railroad Baseboard
for My Modular Layout and Wired and Ballasted the Track
|
By James S
My layout which is basically a shunting layout
with some industries and branch lines has an interchange in it, and I have
found that that interchange has been just a little too small for some of the
train movements I would like to do.
Because my layout is
modular, in other words it’s made up of different sections joined together I
have the ability to add sections in where I feel is necessary. My plan is to
add an extra three feet between two joins to lengthen the interchange tracks
and to provide a longer main line run as well. Model trains for beginners
needn’t be difficult, so I have made this simple tutorial to show how I did
things. The downloadable book at the right has much more model train and
railroad info and tutorials to get you started. It is highly
recommended.
|
Click Here To View
Video
|
 |
Model Train Baseboard
Construction
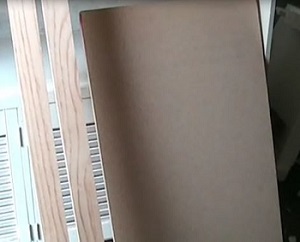
This is how I make the
three by two foot board for that. I did the framing and attached everything
together. The first thing I had to do was buy the materials. I managed to get
quite a large chip board base for about $10.
What you can see is part of
that base, I had it cut to measure to 3ft by 2ft, and I also had to buy some
six foot long pine planks or boards. They will constitute the frame and the
chip board will constitute the top of the baseboard.
|
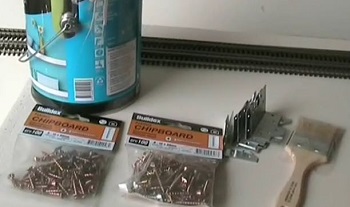 |
I also needed to purchase
some paint, and also two packets of screws. One packet is three quarter
inches long screws and the other is about an inch and a quarter long. Also I
bought a number of brackets and a paintbrush. All of these things are
required to make the baseboard. When painting, it’s always a good idea to
use a drop-sheet (in other words an old sheet or something like that), that
can catch any dripping paint so that you don’t get any paint on your floor
or floor coverings. You can buy a disposable plastic drop-sheet from a DIY
or discount store for a couple of dollars.
|
When you’re painting the frame and
baseboard materials make sure that you give it a good covering and do the edges as well.
That will just help to seal that all up so that any moisture won’t cause any problems for
it. It can be a little bit of a slow job getting that done. I normally do just one coat for
the framing materials and then sometimes I put an extra coat on the top of the baseboard,
just to make it a bit more sealed up on the top. Considering where the track and everything
is going to go, we don’t want moisture wrecking the railroad do we. Make certain all pieces
of wood and framing are properly sealed and covered on all sides with paint. After the paint
is thoroughly dry 4 pieces of framework need to be cut to size.
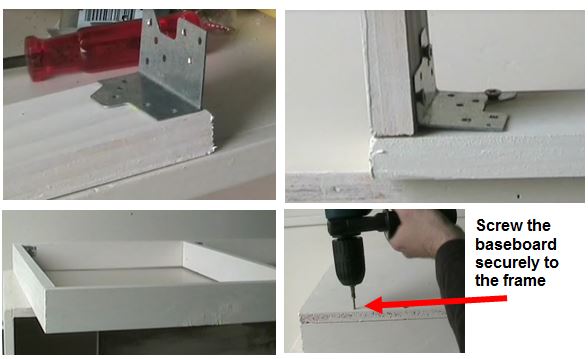
Use ¾ inch screws
for attaching the corner brackets to the top frame pieces. The photo below still needs some
screws to be added. For added strength we can glue the frame piece ends together. Add braces
inside the frame about every foot or two.
After the frame has
been completed we then need to put the baseboard on top. We need to square it up with the
piece on the front. Then we add screws along the front first of all. To attach the baseboard
to the frame we use the one and a quarter inch screws rather than the shorter
ones.
 |
After we’ve done the one
side we need to square one of the other sides up to make it squares all
around.
When attaching the frame to the baseboard you should put about three screws
along each side, just to make sure that there’s enough for at least this size
board.
If you’re having a bigger board for your model trains, you would need more
screws to attach the baseboard to the frame.
|
Track Wiring For Beginners
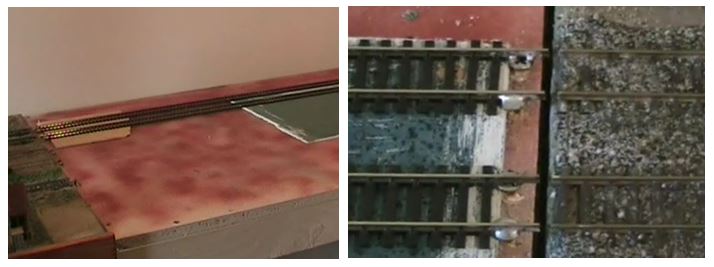
This is the new baseboard section. Because my model train
layout is modular I can add this section in between two other modules to lengthen the part
of the layout that I wanted to lengthen.
One thing we need to be really careful of if you’re making a modular layout, is that the
tracks are aligned between the modules. As you can see below, those tracks
are nicely aligned. It is really essential to make the tracks nicely aligned so that your
trains will run well.
The first thing we need to do is put some screws into the
board where the track is going to be aligned with the track on the other module. I’m
normally use fairly small screws for this as it really only is there to hold the track in
place and to hold it in the baseboard. I’d normally drill a couple of small holes just to
help to guide the screws in too. It just makes it a little easier to do.
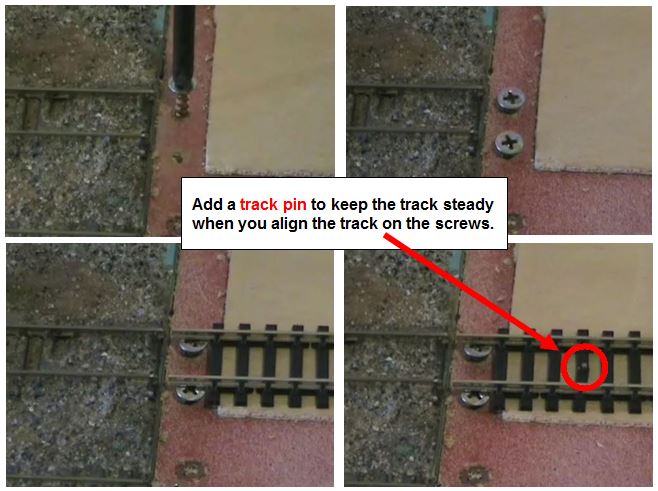 |
It’s important to align the track on the two
different modules vertically as well as horizontally. I normally would put
just one small track pin in just to hold it while I’m soldering. One thing
you can do just to test the alignment before you solder it, is just to run a
piece of rolling stock over it and just hear how it sounds and how it
feels.
If it feels and sounds good then you’ve aligned it pretty well. Beginners and
experienced railroaders; you won't want your model trains flying off the track
at a misaligned join. Another thing you can do is look down the layer and
across the module like this and you can just see how the track is lined up as
you can see it’s lined up pretty well.
|
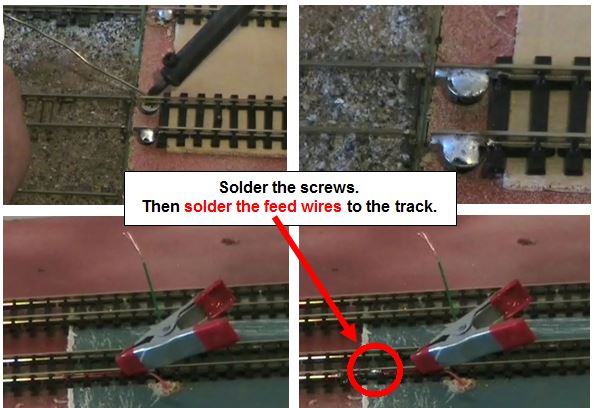
When you’re putting the solder on, put quite a
bit on, as the more there bonding the screw and the rails, the better it’s going to hold.
But you don’t want to add too much even still. Then we do it on the other track as well. I
generally do just the outside rails, although you can do the inside rails if you want to, to
give it a bit more strength. Try to put a little bit less on the inside rail, that way it
won’t disrupt any of the wheels.
|
Learn more...
|
Once ballast and everything is
added to that you’ll hardly know it’s there and it’s a good strong
connection. You’re not going to have any problems with alignment of track
once you’ve done that. Your model trains shouldn't fly off the track.
The next thing we need to do is add wires to the track so that there’s power on
the track. Normally what I do is put a screw right through the baseboard and
that provides a hole just big enough for the track feed wire to go through. You
do that on both sides of the track because you need power for both tracks.
The next thing you need to do is put the feeder wires through the bottom of the
baseboard. And then once you’ve done that we just need to take off a little bit
of the coating on the end of the wire.
|
|
I normally use a little clamp
like this just to clamp the wire on to the rails so that when I’m soldering
up I have two free hands. It means it’s going to be a lot easier to solder
if I don’t have to try and hold the wires steady while I’m soldering it at
the same time.
Once the solder is set you can then take the little bracket off. Then
you need to do the same to the other wire on the other track.
|
 |
For Beginners: How To Ballast Track
One of the things that makes track work look
realistic is doing some ballasting on your track. Ballasting basically means putting the
little rocks and things on the track, just like the real railroads do. However, beginners
will soon discover it needs to be done carefully, otherwise the model trains could derail
frequently.
Some of the things you’ll need is some watered down wood glue, a syringe without the needle
(you could use a large eye dropper), a stiff paint brush and a quantity of ballast depending on
the length of track you want to ballast. For ballast you could use dyed sand, crushed rock or
commercially available ballast materials from companies like Woodland Scenics.
The first thing we need to do is actually put the ballast on the track. To do that, we just put
it in a suitable container so as to give some control over where the ballast is distributed.
And basically you just sprinkle it in place. I tend to heap it up fairly high inside the rails
you’ll see why in a minute.
The next thing we need to do is grab out stiff paint brush and just gently move it along the
track so that the ballast spreads out. It goes on both sides of the rails when we do that. And
it gives quite a nice profile to the ballast.
Then what we need to do is fill in some of the gaps that we’ve got, just to make it look a bit
more complete. And a little bit on the side as well doesn’t hurt. Then gently with the brush
just spread it out again just to give it a nice, even look.
You just need to check that there are no bits of ballast too close to the edge of the rail. I
just run my fingernail along just to check that, and that tends to loosen the bits of ballast
that might be sticking there. The next thing you need to do is using a glue mixture and the
syringe minus the needle, is to actually wet it.
Then all we do is we just gently drop the glue mixture out of the eye dropper or syringe. What
I normally do is the middle of the track first because the glue tends to spread out when you do
that anyway. That means you’re not going to have too much glue running all over the place or on
the parts of the layer where you don’t want it. That should saturate that ballast mix quite
well. A few drops of household dishwashing liquid can be added to the glue mix to help it soak
into the ballast.

Then we just do it along the side of it as well
just to complete the ballast and make sure that everything is wet. Then what I normally do
again is just run my fingernail along the inside to make sure that any ballast is away from
the edge of the track. This is especially important if you’ve got larger wheels or flanges
on the wheels. That helps to loosen any ballast so that it doesn’t get stuck there when the
glue sets.
That will take quite a while to set; at least a couple of hours depending on the temperature of
the room. And once that’s done you can do another section and you can even do another section
while that is setting. In no time at all your model trains will be rattling along the track,
although if you have done a good job of your trackwork your trains won't rattle too much... and
they should stay on the track without derailing every few feet or at every join.
Model Railroad Scenery Tips
How To Make Model Railroad Scenery
Model Railroad Scenery Techniques
Model Railroad Tunnels
Note. This website has no association withe the
Model Trains For Beginners website. The term is just
used to identify that this webpage is for model train beginners or anyone getting started in
the hobby.
|
